Thursday, October 25, 2012

Crafts for my littles!

I am a member of a sorority on my campus, Sigma Phi Lambda, and every semester we do a Big Sis- Little Sis appreciation week! Well this semester I was very inspired to make lots of crafts for my littles! I am telling you, if this is any sign of how I will treat my children they will be spoiled rotten for sure!

The first thing I made was a canvas I painted and then glued embellishments and a saying on. To paint the stripes I used blue painters tape and then painted the space in between. The flowers I purchased at Hobby Lobby in the scrapbooking section. I saw the little saying on Pinterest (of course right??) and I simply used Mod Podge to glue it down! They say "We're not sisters by birth, but we knew from the start; God put us together to be sisters by heart!" If you notice I did one with vertical stripes and one with horizontal stripes. Yes this is on purpose! I try to make things that are the same yet a little different since I have twins!
 

The next thing I made is a picture frame. Well I really just embellished it! I grabbed a spool of ribbon and a rhinestone "buckle" both from Hobby Lobby. I am thinking at this point they need to give me frequent shopper points or something! lol I made a bow from the ribbon, slipped it through the buckle and hot glued that puppy down. Viola! A super glam frame that was super easy to make! Or embellish ;)

The final thing I made them were aprons. I bought the red aprons at, where else, Hobby Lobby. I used blue painters tape to make my rectangle, painted inside it with basic black acrylic craft paint, let it dry and used glitter puff paint for the letters! Easy as that! You all know by now that I love to cook, so now when my littles' come over they can use their aprons and cook with me!

Wednesday, October 24, 2012

Easiest, Creamiest, Pot Pie Ever!

This is the version of Chicken Pot Pie my mom has been doing for years after getting the recipe from one of her friends. This is so simple and so satisfying it is great for when the weather gets cold!

Ingredients:
1 box stuffing
2 cans cream of chicken soup
1 can mixed veggies, drained
1 large can of chicken, drained

1. Cook the stuffing according to the box directions and set aside.
2. In a large bowl mix the remaining ingredients. Once combined place in a casserole dish.
3. Cover chicken mixture with stuffing in a even layer.
4. Place in 375 degree oven for 30 mins or until warm and bubbly.

Didn't I tell you this was simple?? Now go enjoy your "pot pie" and cuddle up!  

Tuesday, October 23, 2012

My Roomie is 21!!!!

One of my roommates Lindsey turned 21 last week, so what do I get her? Liquor of course! But I had to class it up and make it crafty so I turned to my best friend, Pinterest! I saw lots of liquor bouquets made with either flower pots or buckets, but for my glam roomie that just wouldn't do! Lindsey loves everything pink, leopard and shiny so I wanted to do all three! I found this large "margarita" glass in the floral section of WalMart and grabbed a Styrofoam ball when I was there too. To secure both the ball and the tiny liquor bottles I used golf tees. The tees were glued to the side of the glass and to the bottom of the bottles. I put pink tinsel and black tissue paper in the empty space around the ball. I purchased 8 flowers from Hobby Lobby, cut the stems and placed them directly into the foam ball. The cute glittery "21" are actually candles that I also got at WalMart. To finish it off I got some leopard print ribbon and tied a bow on the stem of the glass. Needless to say Lindsey LOVED it! I have a feeling I will be getting requests to do these more often!

Thursday, September 27, 2012

The BEST Chocolate Butter Cream Frosting!

I'll admit it, I fit the girl stereo type of loving anything and everything chocolate, so any excuse I have to make something chocolate flavored I will! When I asked one of my friends what kind of cupcakes he promptly said chocolate with chocolate icing. I knew it was time to try a new chocolate icing recipe! I think I may have a new favorite chocolate icing! It was super easy to make and SO yummy! This will be my go to frosting from now on! YUM! Let's get started!

Chocolate Butter Cream Frosting
4 cups powdered sugar
2 sticks of butter at room temp
1/4 teaspoon salt
1 teaspoon vanilla
1/2 cup unsweetened coco powder

1. Cream butter until white with the paddle attachment of your stand mixer. You want the butter to be soft and creamy.

2. Sift in the coco and the powdered sugar slowly. You don't want your sugar to go flying out so set your mixer on the lowest speed until the sugar and coco are combined. After they are just combined turn your mixer up to a medium speed.

3. Add your salt and vanilla and mix on a medium to high speed for three minuets. If your icing isn't as thick as you would like it to be you can always add more sugar to the mix.

Thats it! Easy right? And SO SO SO good! I had left over icing after piping it on to 18 cupcakes, so of course that meant me and my roommates just HAD to eat it over a couple of days, dipping graham crackers into it. Enjoy!

Monday, September 24, 2012

The Elvis

If you know me, you know I LOVE Elvis. But not in the weird "He's still alive, he just got abducted by aliens. The King will return!" kind of way. I love Elvis because I love his music. I love the era he was a part of. I love that his music defined a generation and closed a gap between races with his music. My love was taken to a whole new level when in the 5th grade my mom and step-dad asked me where I wanted to go on vacation. Without hesitation I said Memphis, Tennessee. I got to see all things Elvis including the Mecca of Elvis fans: Graceland. On our stop in the kitchen of our audio tour I learned that Elvis enjoyed fried peanut butter and banana sandwiches. So today I decided to created my version of Elvis's favorite food. Let's get started!

"The Elvis"
Ingredients
2 slices bread
butter
peanut butter
banana

Butter one side of each of the pieces of bread. I never claimed this sandwich would be good for you ;)

Spread peanut butter on the "dry" side of the bread. A good layer, not too thick but you don't want to be able to see the bread through it either.

Cut about 6 pieces of banana and place them on the peanut butter on one piece of the bread. You can cut them as thick or thin as you like.

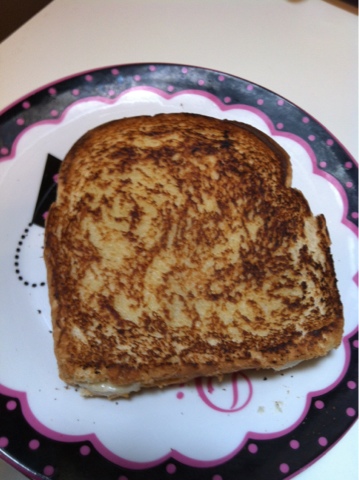
Assemble your sandwich and place it on a hot skillet. Grill it just like you would a grilled cheese.
And this is the result. A warm, melt-y, yummy, sandwich. I know why Elvis loved these so much now! I am a believer! Simple and delicious! Enjoy!

Thursday, September 20, 2012

Creamy Tomato Basil Soup

Ahh, fall. It's time for sweaters, boots, and most important...SOUP! Growing up I was not a big fan of tomato soup because all I knew of it was straight out of the can. Eww. When in high school a bakery in town offered a creamy tomato soup and grilled cheese special on Thursdays. After that I was hooked and I had to find out how to make it on my own! In my searching I found this recipe, and while it isn't quite what that bakery makes, it is good in it's own right! And did I mention it is SUPER easy?? Let's get started!

Creamy Tomato Basil Soup
2 cans condensed tomato soup
1 can tomato puree
1 can diced tomatoes
1 16 oz. block of cream cheese
1 cup milk
1 1/2 teaspoon of Italian Seasoning
1/2 Garlic Powder
 In a medium sized soup pot put all the canned ingredients and the milk in a pot and bring to a boil. Add in your spices and stir.
 Cover your soup and simmer for 10 minutes.
 While your soup is simmering, cube your cream cheese. This is easier if your cream cheese is cold. In other words don't keep it out on the counter while you are doing everything else. Keep it in the fridge so it will be firm when you try to cube it.
 After your soup has been simmering for 10 minutes, put in your cream cheese. The recipe I have said to "melt the cream cheese." Fun fact, cream cheese doesn't really melt. It just turns into smaller pieces. Still yummy!
 After your cream cheese is "melted" you can enjoy your soup! Be careful you will want more than one bowl!

Starbucks Announces Single Brewing Station

Starbucks, the coffee giant, announced that they are introducing their own coffee brewing system called Verismo. Their edge they say? A specialized coffee pod that will allow you to make lattes at home. The machine will use fresh milk and try to reproduce the product that you can get at the store. While this "milk pod" is a new turn to the products on the market I don't think I will be going out and getting one anytime soon. I have a little bit of an attachment to my current Kurig. Starbucks even has their own K-cups if you really just HAVE to have their brand of coffee. I may not have the most refined coffee tastes or maybe their really isn't that big of a difference between other coffees and Starbucks other than the name. I'm not sure. I do know that my Kurig can get me out the door with a cup of coffee in just under 2 minutes. Granted I do not normally drink milk in my coffee unless I am getting it from a coffee chain. Every once and a while I get a small health kick and decide I can drink my coffee without milk just to spare calories. For me, I will stick with my Kurig and Green Mountain coffee. Unless Starbucks wants to prove me wrong by giving me a free machine. In that case, I won't object! Starbucks to 


                                         Starbucks to Introduce Single-Serve Coffee Maker
                                                           (New York Times Article)